Yoga for beginners
Practising yoga can provide both physical and mental wellbeing benefits. Yoga builds strength and flexibility while also supporting you to be more present, grounded and calm.
The sequence below is perfect for beginners and requires no equipment except for something soft between you and the ground - a yoga mat, rug, blanket or towel would all work well. It will take around 15-20 minutes to complete depending on how long you hold each pose for. If you would like to do a longer flow, you can run through the sequence twice before starting the final rest pose, savasna. Once you've got the moves down pat, you can print out this guide to remind you of the flow.
Breath
Using breath (inhale and exhale) is one of the key things that differentiates a yoga pose from simply stretching. While completing the below sequence try using Ujjayi breath, commonly translated as ‘victorious breath’. It’s okay if you forget to do Ujjayi breath from time to time as you move your body into each pose, but when you remember try to bring your attention back to your breath.
How to do Ujjayi breath
- With your mouth open, exhale and make a ‘haaah’ sound, as if you are trying to fog up a mirror.
- Once you’ve done that a couple of times, try keeping the same gentle constriction in your throat you used on your exhale, for your inhale.
- Close your mouth and attempt to make a similar sound but with air going through your nasal passage.
- Inhale through your nose, slightly deeper than normal. Exhale slowly through your nose. Imagine you are still trying to fog up the mirror but with your mouth closed.
1. Cat/cow
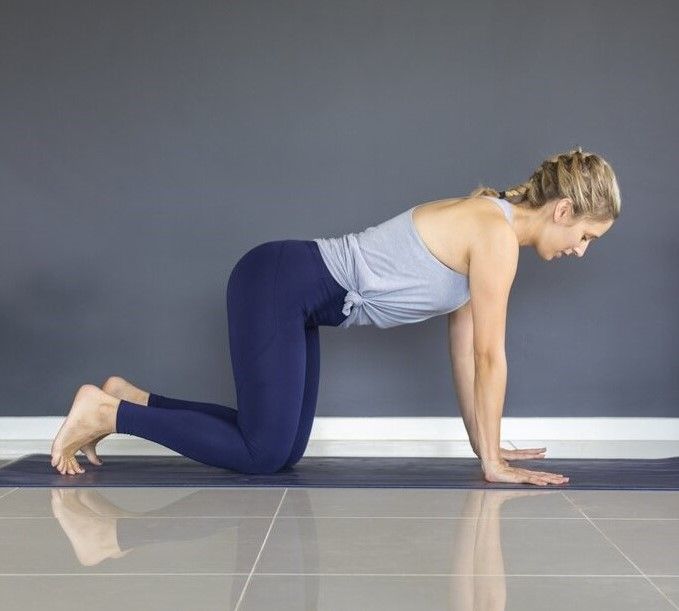
Four-point kneeling position
- Come to a four-point kneeling position, wrists under your shoulders and knees under your hips. If you have sensitive knees you may like to pad your knees by placing a blanket underneath them.
- Tuck your toes under your heels, for more stability.
- Make sure you have length in your back.
- Engage your core. Tuck your pelvis up towards your chest, squeeze the bottom of your tummy muscles and imagine you are trying to get your belly button towards your spine.
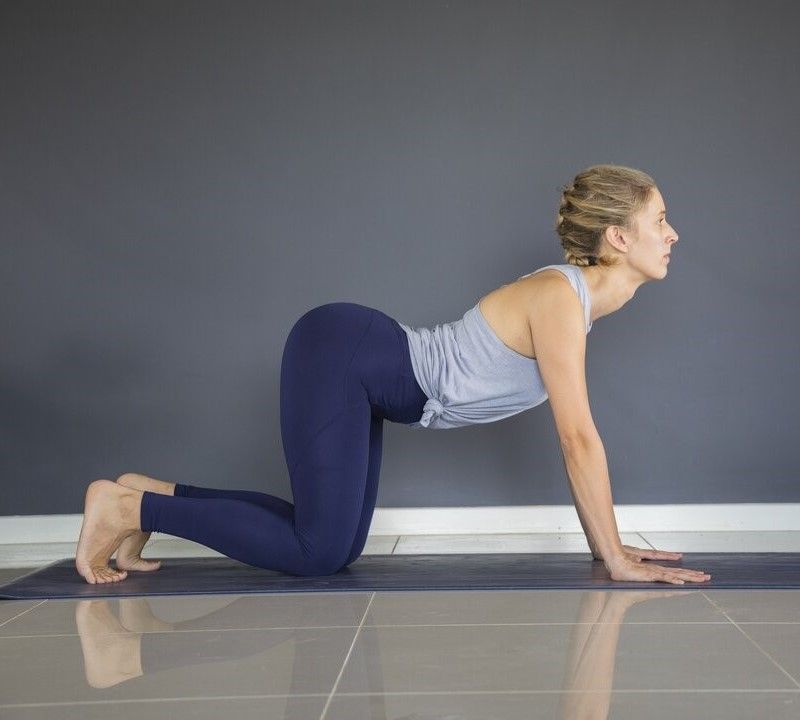
Cow
- Inhale and push your spine down towards the floor, push your chest forward and look forward.
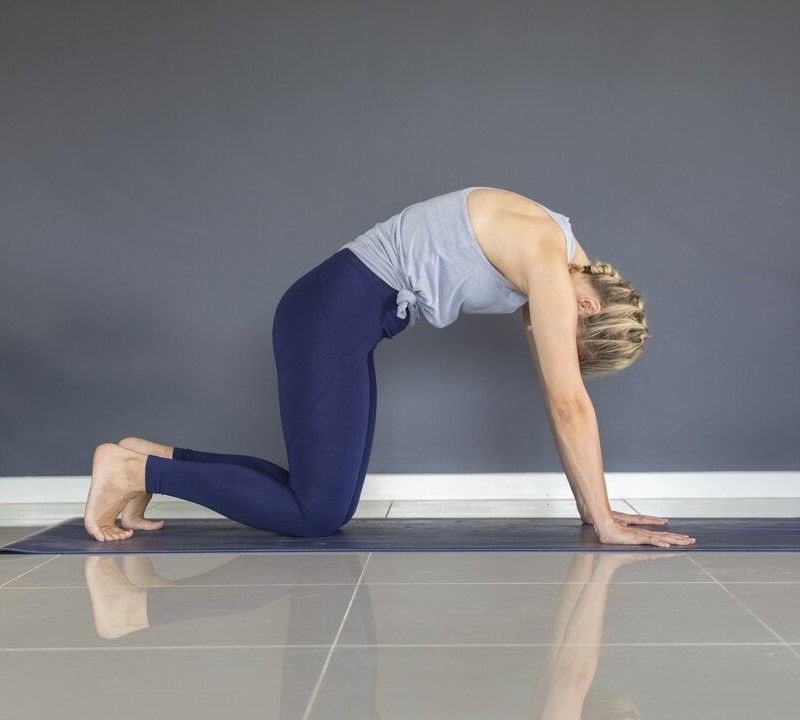
Cat
- As you exhale, round your spine towards the ceiling so it is arched like a cat, and look towards your thighs.
- Repeat the cat/cow movement for 5 rounds of breath before coming back to your four-point kneeling position.
2. Downward facing dog
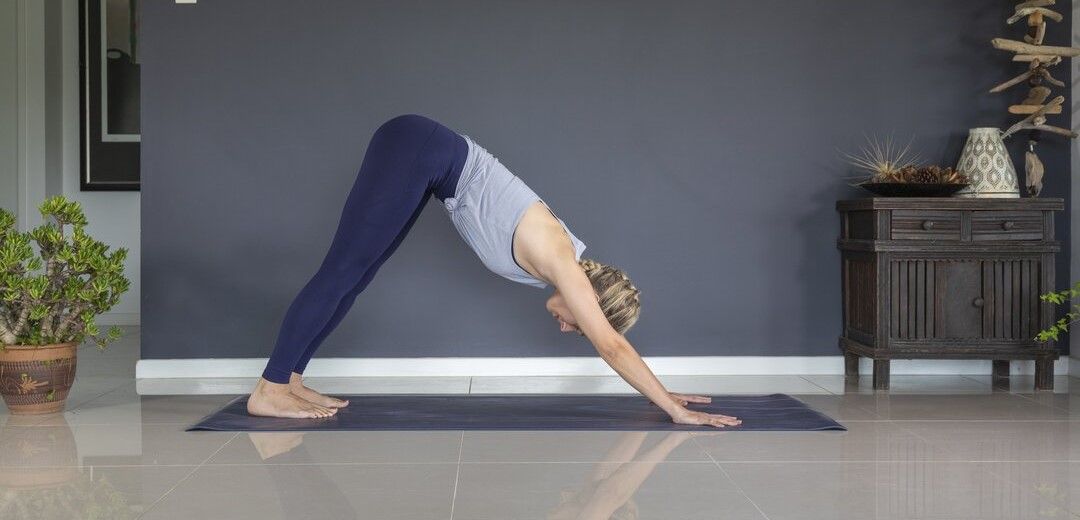
- Starting from the four point kneeling position, place your hands shoulder width apart, with your fingers spread out. Push your weight into your finger pads (where your palm meets your fingers) rather than the heel of your palm to help reduce pressure in your wrists.
- Curl your toes under your heels, engage your core, exhale, and lift your knees off the floor. Extend your legs up and back and push your hips towards the ceiling.
- Lower your heels towards the floor. Don't worry if you can't get your heels to the floor and your legs to fully straighten, this requires a lot of flexibility! It's more important to have length in your spine than straight legs.
- Keep the top of your head in a straight line with the rest of your spine. Look towards your ankles and keep your ears between your arms.
- You may want to peddle your feet up and down if the stretch becomes too much. On your right foot come up to your tippy toes while flattening your left foot to the ground. Then swap sides and repeat for a few rounds of breath.
- Your whole body should be active in this pose, meaning that all your muscles are turned on to keep your body in position.
3. Open twist
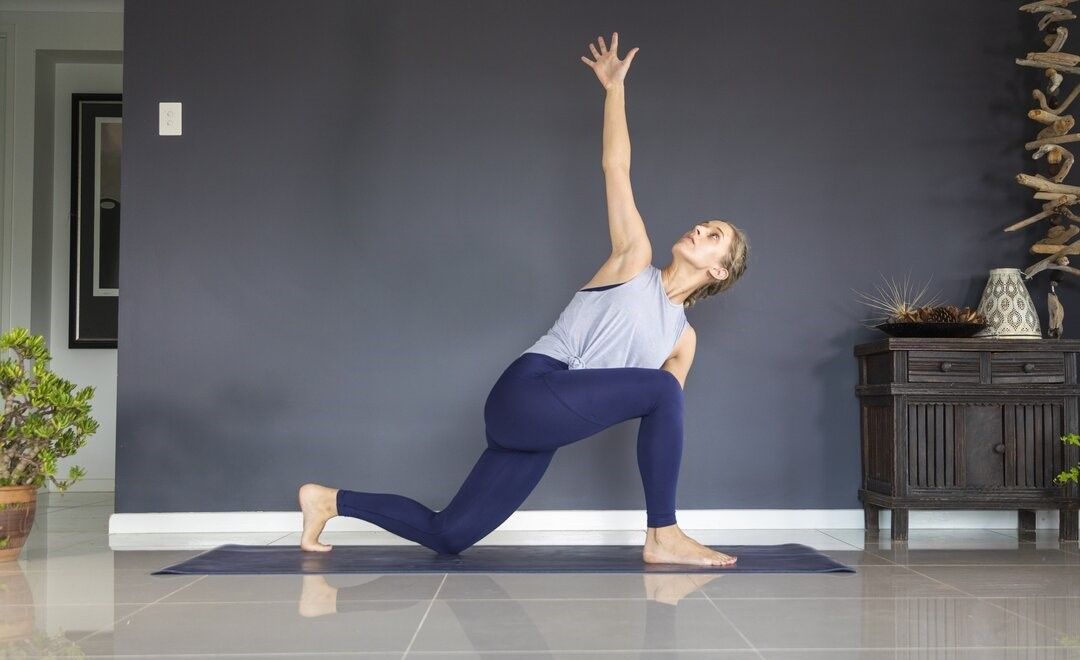
- From your downward facing dog position, step your right foot forward between your hands, in line with your shoulders. Place your left knee on the ground. Keep your toes tucked under for a little extra stability. (If you have sensitive knees you may like to pad your back knee by placing a blanket underneath it.)
- Come onto the fingertips of your left hand. To make this a little easier, you can place your hand on a yoga block or a hardcover book.
- Inhale and place your right hand on your right hip.
- Exhale and twist your torso so it’s facing towards your right thigh, while keeping your hips square.
- Inhale and extend your right arm up. Keep your shoulder back and down, away from your ear. If that’s too much, you can keep your hand on your hip.
- Exhale and twist further open, looking up towards your fingertips.
- On your inhale, engage your muscles to hold the position, then twist further open as you exhale.
- Continue for 3 to 5 rounds of breath.
- On the next exhale, untwist your torso and place your right hand back on the ground.
- Lift your left knee off the ground and step your right foot back into the downward facing dog pose.
- Step your left foot forward between your hands and repeat the open twist sequence on the other side.
4. Downward facing dog

- From the open twist position, place both hands on the floor on either side of your front leg.
- Lift your right knee and step your left leg back into the downward facing dog position.
- Hold for 3 to 5 rounds of breath.
5. Warrior 2
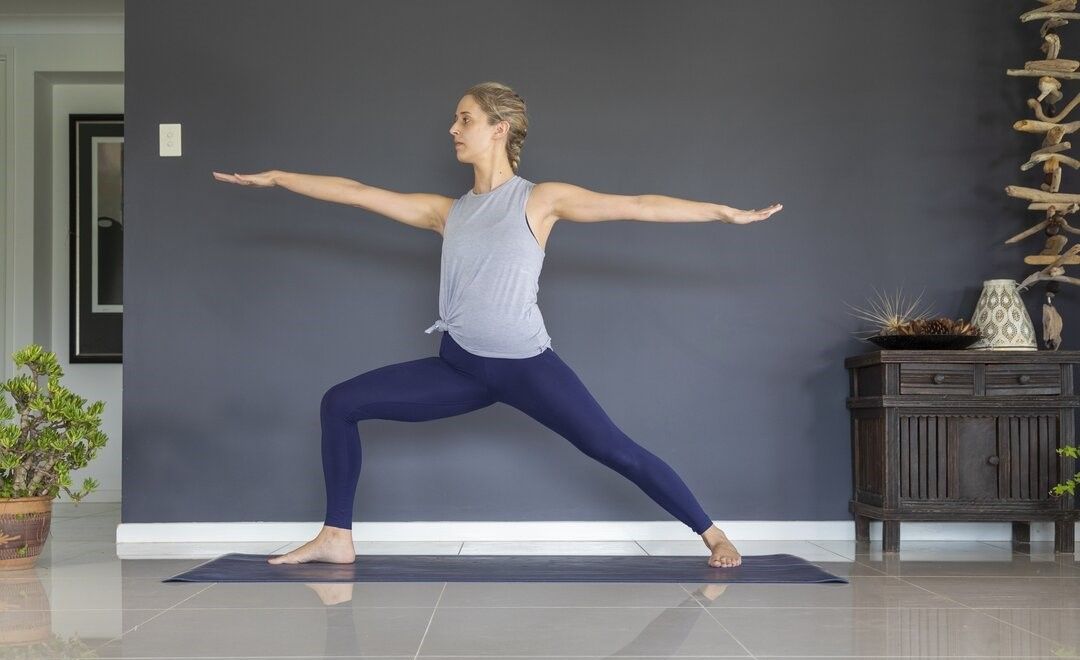
- From the downward facing dog position, as you inhale, step your right foot forward between your hands, with your toes facing forward.
- Turn your back foot sideways, keeping your heels in line with each other.
- Exhale, push your feet into the floor, engage your core and push up with your arms to bring your upper body to an upright position.
- Inhale, and extend your right arm forward and your left arm back in line with your shoulders, with your palms facing down. Look towards your fingertips.
- Exhale, shift your right knee forward over your ankle at a 90-degree angle and straighten your back leg.
- Square your hips and upper body to the front of the mat.
- Hold for 3 to 5 breaths.
Modifications for warrior 2
- For more stability, do this pose with the outer edge of your back foot pressing into a wall.
- If the stretch in your back leg is too strong, you can try shortening the distance between your feet and straightening your front leg slightly.
6. Reverse warrior
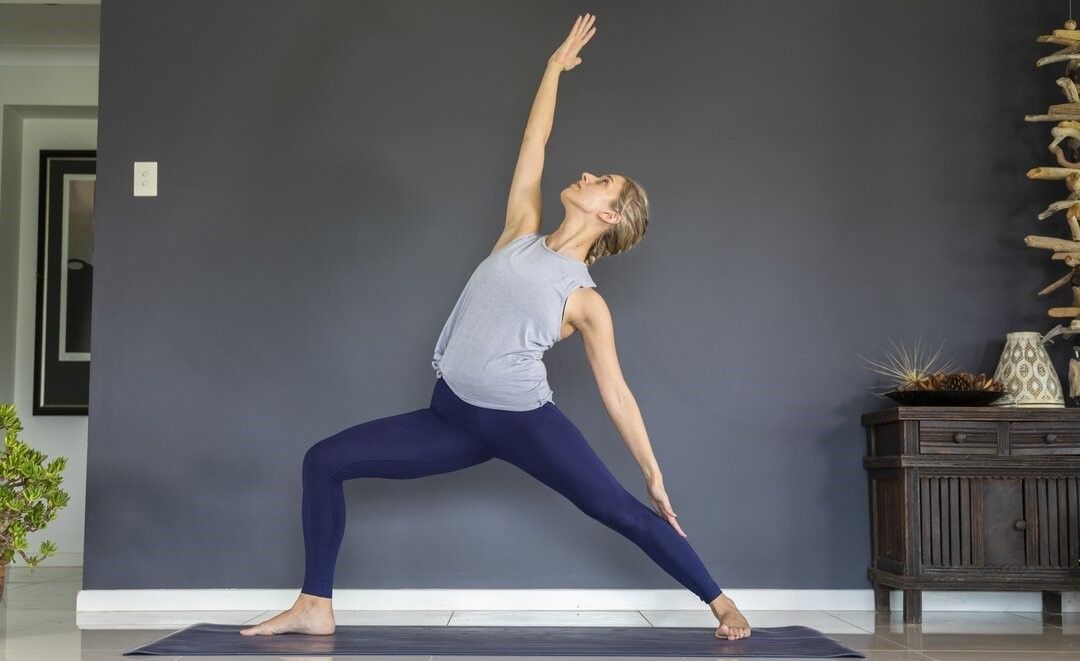
- From your warrior 2 pose, as you exhale, turn your front hand up so your palm faces the sky.
- As you inhale, start to reach your right arm towards the ceiling and at the same time lower your left arm so your hand glides down your back leg.
- Lift your chest towards the sky and come into a gentle back-bend.
- Gaze towards your raised hand if it is comfortable to do so.
- Keep your shoulders relaxed and away from your ears and your chest lifted.
- Hold for 3 to 5 breaths.
Modifications for reverse warrior
- For more stability, do this pose with the outer edge of your back foot pressing into a wall.
- If the stretch in your back leg is too strong, you can try shortening the distance between your feet and straightening your front leg slightly.
7. Extended side angle
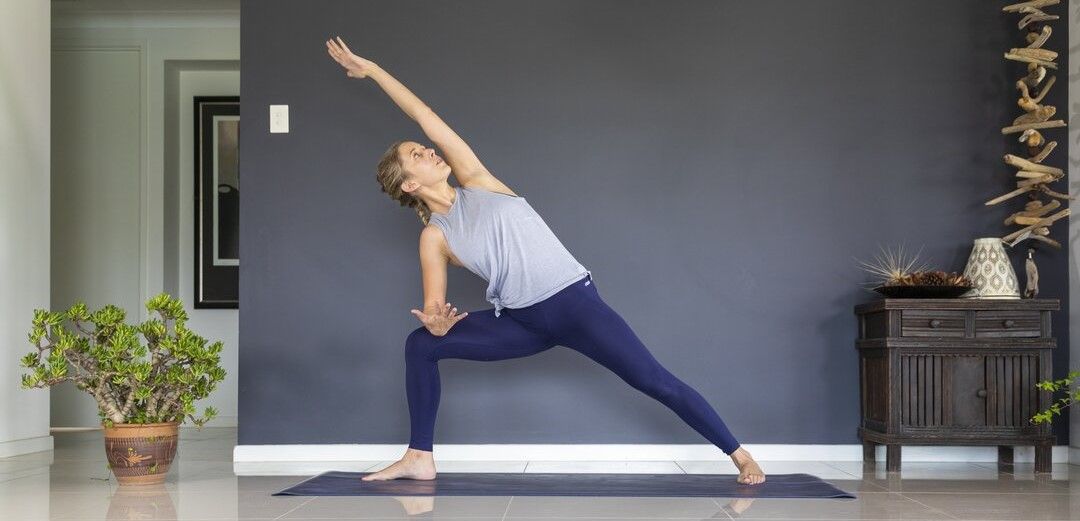
- From the reverse warrior pose, as you exhale, place your left hand on your left hip.
- Turn your hips to the left. As you inhale, lower your right forearm towards your right thigh, while keeping your back straight.
- As you exhale, lift your left arm up towards your left ear, with your palm facing towards the ground.
- Gaze either straight ahead or up towards the sky, whichever is more comfortable.
- Keep your core engaged and your shoulders away from your ears. Think about creating length down the side of your body.
- Hold for 3 to 5 breaths.
Modifications for extended side angle
- For more stability, do this pose with the outer edge of your back foot pressing into a wall.
- If the stretch in your back leg is too strong, you can try shortening the distance between your feet and straightening your front leg slightly.
8. Downward facing dog

- From the extended side angle position, reach your hands down to the ground on either side of your front foot.
- Spin your left foot to face the front of the mat.
- Step your right foot back into the downward facing dog position.
5. Warrior 2

- From the downward facing dog position, as you inhale, step your left foot forward between your hands, with your toes facing forward.
- Turn your back foot sideways, keeping your heels in line with each others.
- Exhale, push your feet into the floor, engage your core and push up with your arms to bring your upper body to an upright position.
- Inhale, and extend your left arm forward and your right arm back in line with your shoulders, with your palms facing down. Look towards your fingertips.
- Exhale, drive your left knee forward over your ankle at a 90-degree angle and straighten your back leg.
- Square your hips and upper body to the front of the mat.
- Hold for 3 to 5 breaths.
Modifications for warrior 2
- For more stability, do this pose with the outer edge of your back foot pressing into a wall.
- If the stretch in your back leg is too strong, you can try shortening the distance between your feet and straightening your front leg slightly.
6. Reverse warrior

- From your warrior 2 pose, as you exhale, turn your front hand up so your palm faces the sky.
- As you inhale, start to reach your left arm towards the ceiling and at the same time lower your right arm so your hand glides down your back leg.
- Lift your chest towards the sky and come into a gentle back-bend.
- Gaze towards your raised hand if it is comfortable to do so.
- Keep your shoulders relaxed and away from your ears and your chest lifted.
- Hold for 3 to 5 breaths.
Modifications for reverse warrior
- For more stability, do this pose with the outer edge of your back foot pressing into a wall.
- If the stretch in your back leg is too strong, you can try shortening the distance between your feet and straightening your front leg slightly.
7. Extended side angle

- From the reverse warrior pose, as you exhale, place your right hand on your right hip.
- Turn your hips to the right. As you inhale, lower your left forearm towards your left thigh, while keeping your back straight.
- As you exhale, lift your right arm up towards your right ear, with your palm facing towards the ground.
- Gaze either straight ahead or up towards the sky, whichever is more comfortable.
- Keep your core engaged and your shoulders away from your ears. Think about creating length down the side of your body.
- Hold for 3 to 5 breaths.
Modifications for extended side angle
- For more stability, do this pose with the outer edge of your back foot pressing into a wall.
- If the stretch in your back leg is too strong, you can try shortening the distance between your feet and straightening your front leg slightly.
8. Downward facing dog

- From the extended side angle position, reach your hands down to the ground on either side of your front foot.
- Spin your right foot to face the front of the mat.
- Step your left foot back into the downward facing dog position.
9. Lying down twist
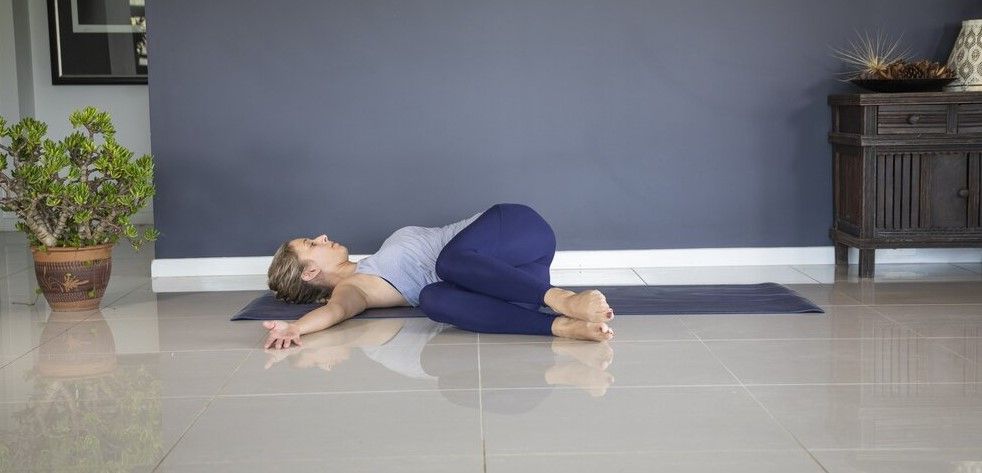
- Move from your downward facing dog position to lying on your back on the mat.
- Bend your knees and place your feet flat on the ground with your knees pointing towards the ceiling.
- Stretch your arms on either side of you on the ground to form a T shape.
- Keep your knees bent and together while gently dropping them to the right.
- Keep your upper body flat on the mat.
- Hold for 3 to 5 breaths.
- Slowly raise your knees towards the ceiling and gently drop them towards the left.
- Hold for 3 to 5 breaths.
10. Happy baby
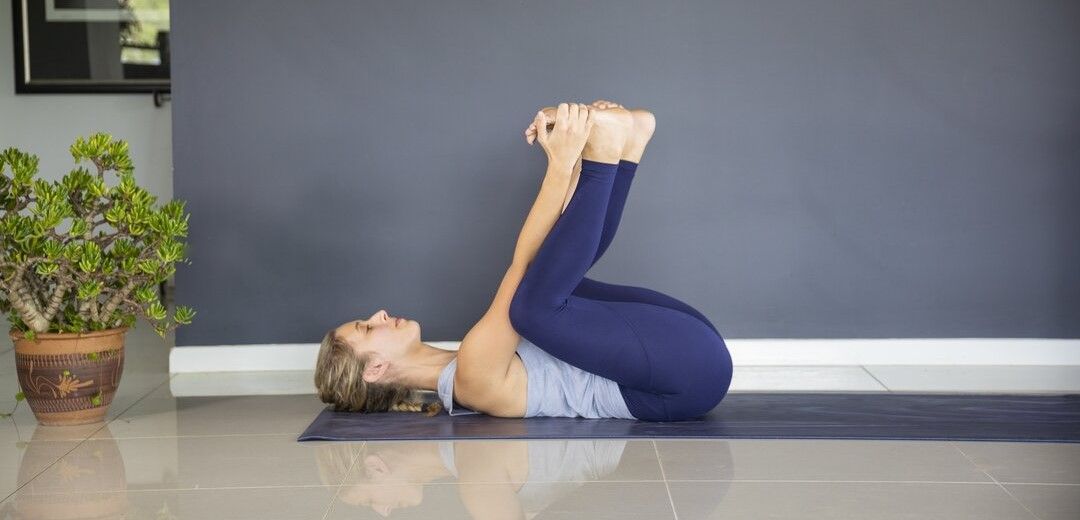
- Still lying on your back, bring your knees into your chest.
- Place your arms between your knees and grab the pinky side of your feet with your hands.
- Keeping hold of your feet, adjust your position until the soles of your feet are pointing towards the ceiling. Your feet should be flexed.
- As you inhale, imagine pushing your hands into your feet, and as you exhale imagine pushing your feet into your hands, without actually moving.
- It may feel nice to rock slightly from side to side, or you might prefer to stay still.
- Hold for 3 to 5 breaths.
Modifications for happy baby
- If you can't reach your feet, you can place a resistance band, belt, or similar, around your feet and hold either side of the band. Gently pull your knees towards your chest.
11. Savasana
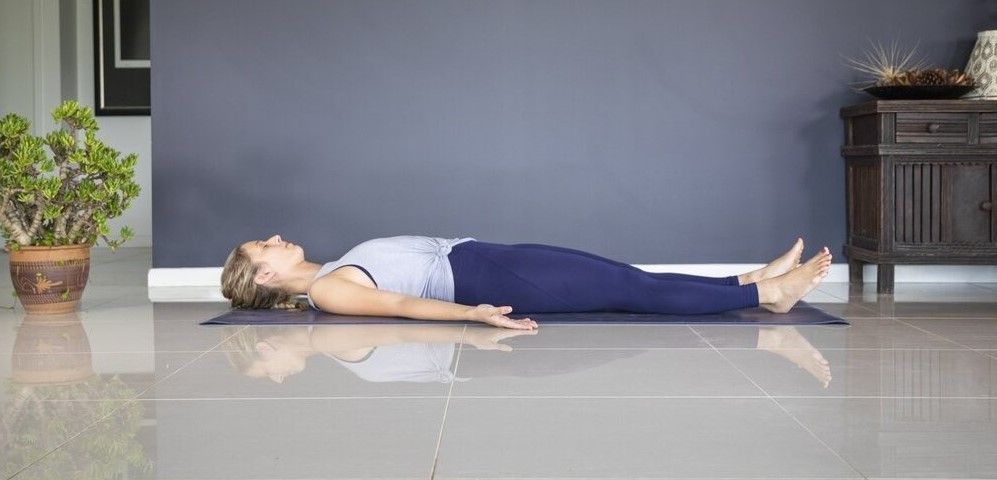
- From the happy baby pose, release your feet and extend your legs out in front of you, allowing them to rest on the mat.
- Place your arms by your side and slightly away from you so they aren't touching the rest of your body. Keep your shoulders down and away from your ears.
- Relax, close your eyes if you feel comfortable to do so, and feel the effects of your practice wash over you.
- Lay like this for 5 minutes or longer.
© The State of Queensland (Queensland Health) 2022. Adapted and reproduced by Cancer Council of Western Australia with permission. Permission to reproduce should be sought from ip_officer@health.qld.gov.au