Composting at home
by Shenae Norris, Cancer Council WA Regional Education Officer for the South West
- August 10, 2020
- Leave a comment
What is composting?
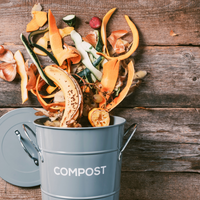
Composting uses the heat from the sun and microbes to turn your kitchen and garden scraps into a precious garden product. Composting is easy and regardless of space, anyone can home compost. Even with a small yard, you will be able to follow these steps on a smaller scale. All of our organic household waste (here ‘organic’ means that it’s made from plants, or animals or their byproducts) can be composted. Food scraps is the big one, but paper, cardboard, coffee grounds and napkins can all go in there!
Benefits of composting
- Reduce your carbon footprint. Organic waste doesn’t decompose properly when it goes into landfill and it produces greenhouse gases. Composting at home means less goes into landfill AND less greenhouse gas is produced.
- Naturally enriches your soil
- Eliminates the need for chemical fertilizers
- Encourages production of good bacteria in your garden
- Helps to eliminate diseases and pests on your plants
- Encourage worm life. Worms helps to aerate your soil, create rich plant food and liquid fertilizer, and generally improve the health of your soil.
Are you ready? Let's jump in!
Step-by-step guide to composting
1. Choose your location
For smaller yards, you may opt for a compost bin or tumbler, but if you have a little more space, you could choose a compost bay or multiple bays for composting at different stages - this is what we have done here. Choose a spot that will get some sun and some shade.
2. Fill it up
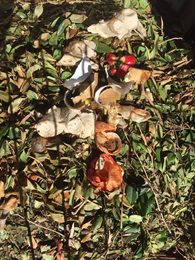
There are three main ingredients that you will need when home composting; green waste, brown waste and water.
- Green (or wet) waste – Fruit and veg scraps, egg shells, tea leaves, coffee grounds, grass clippings
- Brown (or dry) waste– dead leaves, branches, twigs, straw, paper, cardboard
- Water – to keep the pile moist but not wet
Note 1: Avoid cat and dog poo, glossy cardboard or paper, treated wood, weeds that have gone to seed, wood ash, sticky labels on fruit and meat/bones.
Note 2: The smaller your materials the quicker it will decompose, so try to chop your scraps in the kitchen before throwing in the compost bin and remember to rip up your egg cartons.
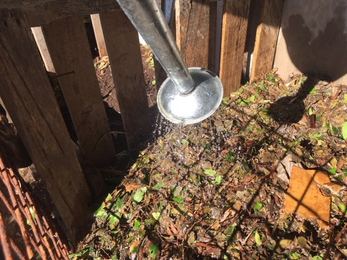
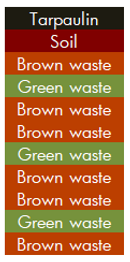
Add layers of green and brown waste, adding a little water after each layer to keep the pile moist (not wet). You want roughly twice as much brown waste as green waste. Finish off with a layer of soil or finished compost – this helps with the smell and adds microbes to your pile.
Then cover the compost pile and let those microbes get to work! We used a tarpaulin to cover it, but you can use just about anything you have laying around (old carpet, wood, plastic, etc.)
3. Aerate your pile
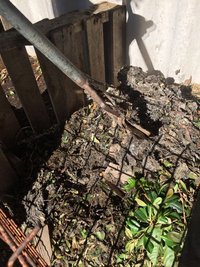
Stick a pitchfork in your compost pile and turn it over. Really get that air in there. Do this every 3-4 days to aerate when it’s hot, and every 1-2 weeks when it’s cool. This step is important because as the microbes digest the scraps they use up the air and they need a fresh supply. It will also help to avoid smells and ensure that your heap doesn’t overheat and combust (rare, but possible!). Add water to moisten the heap whilst aerating before covering up again.
Using multiple compost bays allows you to create more than one compost heap at the same time. When you have enough green and brown waste to create a second heap, move it across to another bay (for excellent aeration) and then start on your second heap.
4. …and repeat!

Generally speaking it will take two or three months, but the size of your materials, the location of your heap, the time of year and the temperature of the compost will all influence how long the process will take. Slowly the microbes that have developed will decompose the materials.
Continue aerating and moistening the heap until the compost crumbles easily and is rich brown in colour. Voila! Your compost is now ready.
Storing your compost
Ideally you want to use your new living compost filled with good microbes and bacteria as soon as possible. The longer it is stored the more chance it has of losing nutrients. If you are using a multiple bay compost station then you can keep the compost in one of the stations while you continue to make more. If you are short on space you can transfer it to a spare bin.
Don’t forget to keep it covered and occasionally aerate and spray with water to keep your compost moist and nutrient rich. This will also help to avoid combustion! Watch as the worms find their way into your heap, leaving their rich castings (aka worm poo).
Compost will help your garden to retain moisture and will act like a conditioner for your soil. Once you start seeing the benefits of composting your household and garden waste you will never want to use a chemical fertilizer again! Plus, if you’re lucky, you may even get a surprise tomato plant pop up that you didn’t intend to grow!
We’d love to hear about how your garden grows! Tag the LiveLighter Campaign in your socials (on Facebook and Instagram). We’ve also got loads more tips about gardening over here.