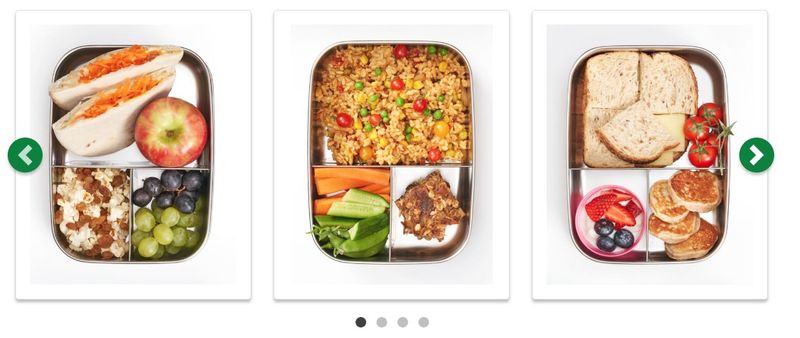
5 lunchbox hacks to save time and money
by Anne Finch, Accredited Practising Dietitian for LiveLighter
- January 20, 2026
- Leave a comment
If you’ve got one kid in full-time school, that’s about 200 lunchboxes a year. So shaving even a little bit of time or money off the weekly routine will really add up. These tips will hopefully also reduce the mental load of planning, shopping and deciding what to pack. Getting a little brain space back? Priceless.
1. Assemble some scroggin (aka trail mix)
Maybe it’s bold to lead with this one, and maybe it’s bold for it to be a whole tip on its own. But I stand by it. Home made scroggin is cheap, shelf-stable, customisable, nutritious and easy-to-eat. Mix and match as you please, but here’s my rough recipe!
- Pumpkin seeds (½ cup)
- Sunflower seeds (½ cup)
- Pretzels or grainy crackers (½ cup)
- Popcorn (1 cup)
- Wholegrain cereal like Cheerios or Weetbix bites (1 cup)
- Dried fruit (small amounts, being mindful that it gets stuck in teeth) (¼ cup)
- My school has a no-nuts policy so I don’t include them, but they’re a great addition if you can.
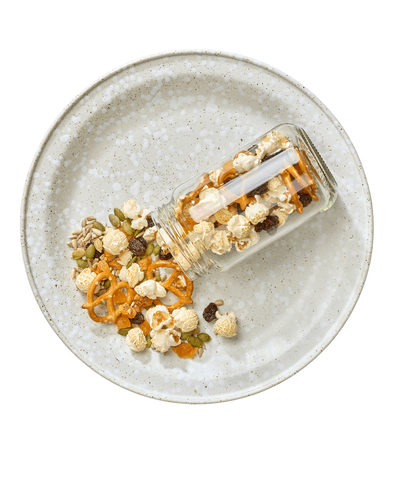
That batch works out at $2-3 and will make 10 x 200 mL containers ($0.25 each!). And there will be loads of leftovers to see you through the coming weeks. Making the trail mix is a great job for kids – independently or with assistance. Please note building these kitchen skills in your littlies will save you time… eventually. It’s a long game!
2. Breakfast leftovers
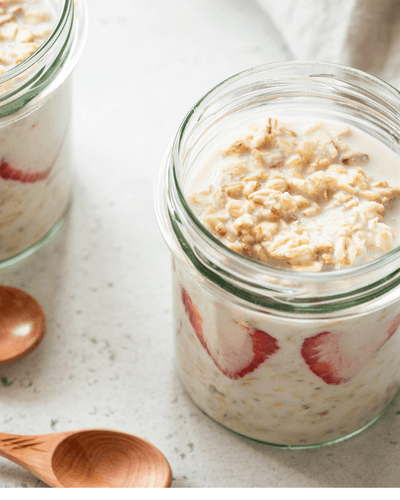
Breakfast leftovers make excellent recess/ morning tea! Depending on your routine, you might like to make extra at breakfast and pack it away ready to grab for tomorrow’s recess, or if your kiddo doesn’t mind a repeat pack it for the recess the same day. Some dishes that work a treat:
- Overnight oats
- Fritters
- Avocado and egg sandwich
- Pancakes
- Chia puddings
- Muesli + yoghurt + fruit (canned and frozen are super convenient)
- Porridge (yep, cold)
- Smoothie (this one has an intriguing secret ingredient). Use less liquid and/or or add some chia to make this into a pudding to eat with a spoon.
3. Frozen foods
Preparing lunchbox snacks in bulk and freezing them is a winner to:
- Save money as larger packets of ingredients are generally cheaper per unit, and cooking at home is cheaper than buying pre-made.
- Save time because batch cooking means only doing the washing up once for many meals.
- Stress less in the mornings by having all or part of the lunchbox pre-made.
- Frozen items are usually defrosted by recess/ lunch time and will help keep the rest of the food cool.
A few suggestions that go down well in my house.
- Mini pizzas made on wholemeal English muffins or pita bread
- 5 ingredient muesli bars
- Quick corn pikelets or pear pikelets (shop-bought are great too)
- Brownies or muffins
- Bean balls or meatballs (shop-bought falafel or meatballs work a treat too!)
These are also great recipes to get the kids involved in, with plenty of measuring, mixing, spreading, pouring and dishwashing jobs.

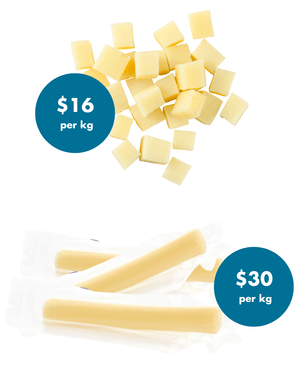
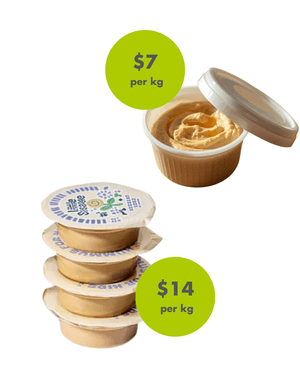
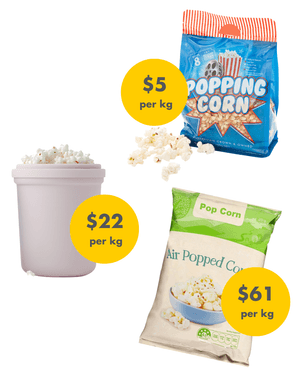
4. MYO mini-packs
Let’s stop paying more for smaller packets of things wrapped in extra plastic. Here are a few lunchbox classics that are straight-forward to divide into “grab and go” portions. If you want to feel extra fancy and organised you could even devote a tub to these in the fridge or pantry.
- Cheese – chop into sticks or cubes (choose mozzarella to keep the “string pull” experience) ($16 v $30/ kg).
- Popcorn – pop your own or divide up a big bag into small, air-tight containers ($22 v $61/ kg)
- Dips – divide salsa, hummus or other dip into little reusable pots ($7 v $14/ kg)
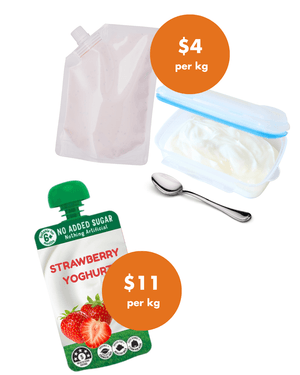
- Yoghurt – decant into reusable pouches or containers (don’t forget the spoon) ($4 v $11/ kg)
- Pretzels and crackers – divide up into small, air-tight containers ($10-20 v $30-60/ kg)
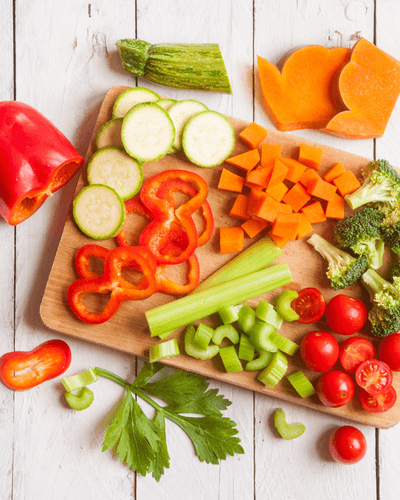
5. The Vegie Bucket
This is where you prepare your veg (and fruit) for their lunchbox adventures for a few days at a time. Grating some carrots for sandwiches and chopping some carrots for snacks, slicing some cucumber for sandwiches and chopping some into sticks for Crunch&Sip, washing and trimming some celery so it’s ready to go – you get the picture! Then in the morning (or the night before) you can assemble the lunchbox without making any dishes. Hot tip: adding a wet paper towel helps keep salad vegetables like cucumber, carrot, capsicum and celery fresh for longer.
You can also choose fruit and veg that don’t require any prep – just wash and go! Our favourites are snow peas, cherry tomatoes, baby cucumbers, mandarins, small apples and blueberries. Cheaper when they’re in season, but worth the convenience some days. Because they’re whole, they also last longer and can (with the help of a freezer brick) go straight back in the lunchbox for the next day if they come home again. Canned corn spears, frozen berries and canned diced fruit (in juice) are also great shelf-stable “no-chop” options.
Want more?
We’ve got more Back to School blogs from the parents in the team. You can also check out our friends at Crunch&Sip, bringing you info and inspo on school nutrition. They’re on Insta and Facebook, sharing fab tips for parents and teachers. They also run free Packed with Goodness sessions, answering all your curly lunchbox questions. Have a great week back at school!